Table Of Content
And it’s perfectly straight, see? You don’t have to do what you designed. You can change your mind at the last minute. I didn’t know what color you’re cutting. Again, it goes under the two guides on either side.
How to: Save and Share Projects with Design Space®
Now, again, this one will be a little harder to get off the mat because it’s more detailed, but we do it the same way. We flip our mat over onto our surface and we peel the mat away instead of the other way. Now, don’t just rip it off because you have a lot of little detail here.

CRICUT ACCESS
Maybe it’s the stars that’s doing it. So I’m gonna move it over a little bit. Even though that’s probably centered, I like this better. It was probably that little star there that’s doing that for me. All right, so now we’re almost there.
Cricut's crafty machines are creating big side-hustles - 9News
Cricut's crafty machines are creating big side-hustles.
Posted: Sun, 05 Jun 2022 07:00:00 GMT [source]
HOW TO REMOVE MATERIAL FROM A MAT
Did this Cricut Design Space Basics tour help you out? Let me know — I love to know I’ve helped you! You can share your success in our Facebook group or tag me on social media with #jennifermaker. The very top row is promotional information from Cricut — so that means sales, new features, or anything else they want to call your attention to. Once you have the Cricut Design Space DMG file (Mac) or EXE file (Windows) downloaded, double click it to install it, then open up Cricut Design Space.
Introduction to Cricut Maker® 3
So there’s some calendars here. There’s actually a fair number of free things, and you can scroll through and you can make, they have some cute cards. This would be a fun thing to make right now, not dissimilar from our project that we’re doing today. So lots of things that you could do for free.
So we have slice, which is very different. We can change the color of it. And if we go up here to the line type menu, next to the menu that says cut, which is our default, our default choice is to cut, we have currently a dark gray box. This is the color picker box, and if I click on it, I get access to a menu of common colors.
Materials
We can engrave it, like a piece of acrylic or something like that. We can, and of course, this is if you have the tools, right? With your Maker, you get the fine point blade and the rotary blade and the other ones, as we discussed in lesson two, are available separately. So there’s also deboss, wave, perf, which means perforate, and then foil and the different tips.
How to: Upload Images
So it stores everything you upload. Unless you tell it to delete, it keeps and that’s very useful. All right, so we’re gonna click on upload image and then we click on browse. Now, you can drag and drop files here. I never do it because I just find it’s not reliable.
I’m gonna put my signature in here. And the other is the certificate paper. Now, what I’d like to do is join these two hearts together permanently. So I’m gonna kind of offset them like this and create a new shape that looks like two hearts together. Now, right now, they’re two separate hearts.
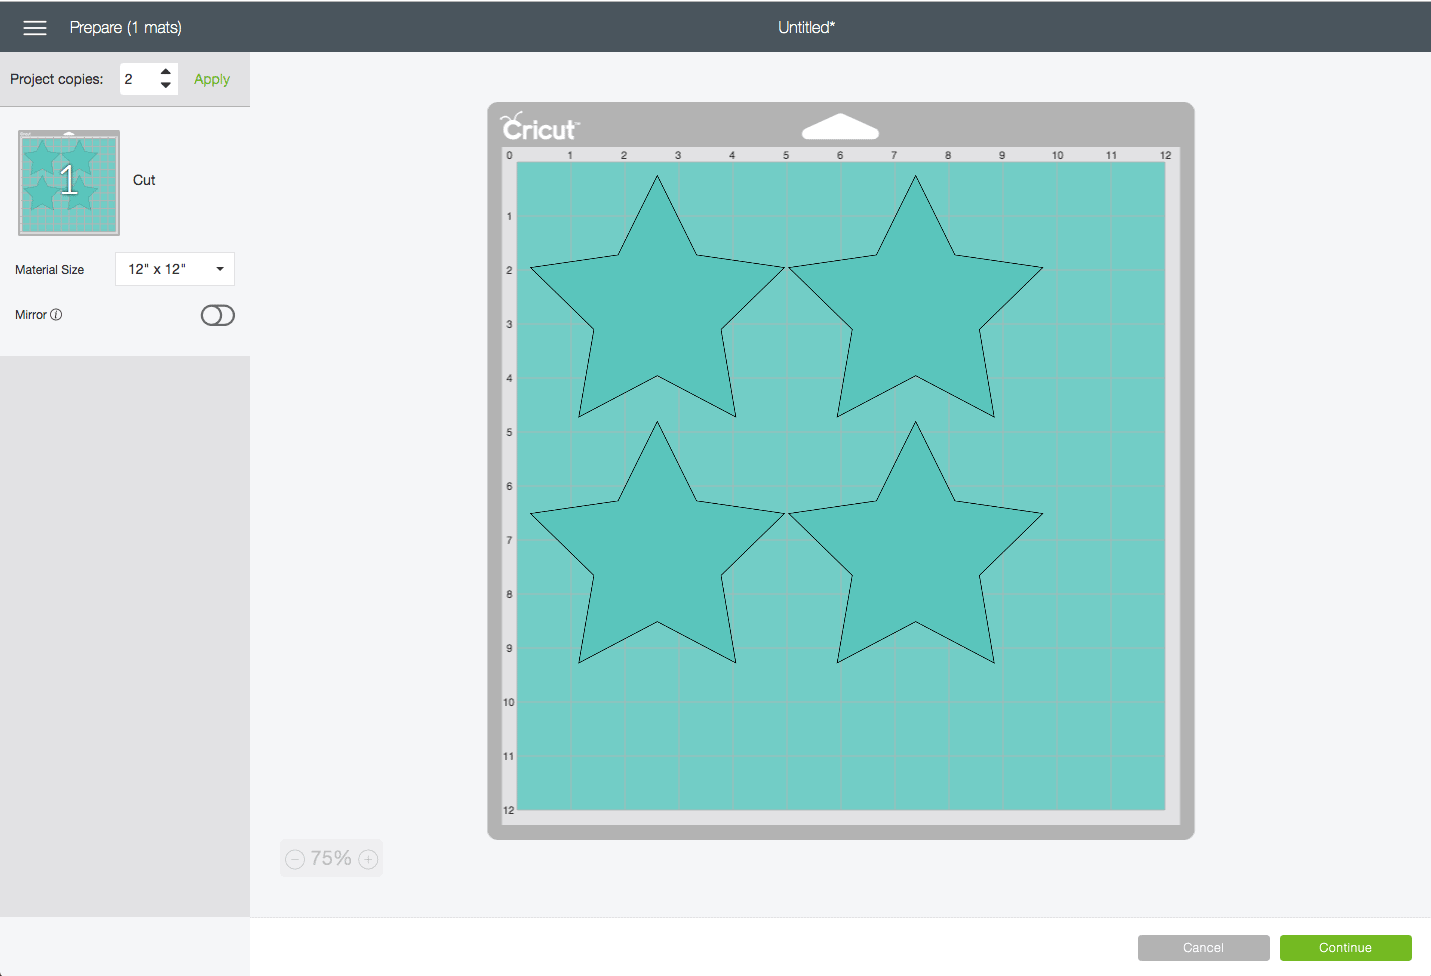
Another thing that you can do is actually move things to the same mat. So for example, if you click these three little dots, gives you a menu, you can hide it, of course, if you don’t wanna cut it, but you can move it and I can move it to my yellow mat. So we are ready to cut this so let’s go ahead and click Continue.
And then in the lower right corner, this is the resize handle. If you click, hold and drag it, it makes it smaller and bigger. And you’ll notice it maintains its ratio. It doesn’t get like skinny, even if I go like this. It still is keeping the shape, and if we don’t want that, let’s say we wanted a chubby heart, we would go over here to the fourth icon in the lower left corner.
So we have the blue layer and the yellow layer. And we see our writing on our card is not somewhere else, and it says draw and cut here. And this one says just cut, which is what we want. These are actually really small, and it doesn’t matter. So grouping is an organizational thing, but it doesn’t really keep the things together on your mat.
This lesson will show you how to apply iron-on material to customize home decor, fashion accessories, and more. Take the guesswork out of learning to handle this material with our helpful video guide. Use this free resource to quickly determine the right materials and tools to use for your next project. Learn how to get the most out of Cricut Maker 3 with up-close-and-personal tours of Design Space, your new cutting machine, and Smart Materials™. Learn how to set up your new cutting machine, load Performance Machine Mats and Smart Materials, and perform regular maintenance.


No comments:
Post a Comment